
Discovering Tokyo in the Height of Sakura Season: An Essential Addition to Your Bucket List
# Experiencing Sakura Season in Tokyo: A Dream Fulfilled
Visiting Japan, particularly Tokyo, during sakura or cherry blossom season has long been a dream of mine. It took Mike and me nine years of trips to Japan before we finally experienced sakura. This wait wasn’t due to missed chances or a lack of interest; it stemmed from a blend of concerns about the crowds and our preference for other seasons in Japan.
In 2019, we decided it was time to change our routine. Despite my early doubts, Mike urged us to organize our trip around the peak of cherry blossom season. This turned out to be one of our smartest decisions.
## When is Sakura Season in Tokyo?
The cherry blossom season changes from year to year based on climatic factors, but it usually takes place in early April. Various websites and calendars offer updates on blooming forecasts, with full bloom being the prime moment to observe the gorgeous display of delicate pink and white blossoms. The transient beauty of sakura is a much-anticipated event in Japan, symbolizing the arrival of spring and providing a wonderful reason for gatherings and celebrations.
## Best Places to View Sakura in Tokyo
Mike and I successfully booked our flight right at the beginning of the peak season. Our intention was to spend a day in Tokyo enjoying the blossoms before embarking on a short train journey to explore other areas of Japan. After a lengthy flight, we dropped off our luggage and made our way to one of Tokyo’s prime cherry blossom locations: Nakameguro.
### Nakameguro
Nakameguro is a bustling neighborhood brimming with delightful eateries, trendy cafes, and boutiques. The Meguro River, adorned with sakura trees and glowing with pink lanterns, is a favored Instagram location. Although it can get crowded, especially during busy hours, we arrived in the afternoon when the crowds were more manageable. The atmosphere was lively, and the sakura were stunning.
Street food vendors enhanced the experience, offering sakura-themed delicacies and traditional Japanese festival foods. I savored grilled mochi with a sweet, garlicky sauce and we sampled yakisoba along with other tasty options. The variety of street food was impressive, featuring choices like strawberry drinks, takoyaki, and miso dango.
### Chidorigafuchi Park
Following our time in Nakameguro, we headed to Chidorigafuchi Park close to the Emperor’s Palace. Arriving at sunset, we admired the sakura glowing against the evening sky. While beautiful, the park was considerably busier than Nakameguro, filled with both tourists and locals. We took a brief walk and snapped countless photos before deciding to return the next day for a more peaceful experience.
The next morning, we went back to Chidorigafuchi Park, where daylight showcased the breathtaking canopy of cherry blossoms. The contrast between the moat’s color and the pink blossoms was stunning, and we enjoyed observing people paddle boats while claiming spots for hanami.
## What is Hanami?
Hanami is the traditional custom of picnicking beneath cherry blossom trees. Groups come together with food, drinks, and friends to appreciate the beauty of sakura. Although we didn’t get to partake in hanami ourselves, we watched numerous groups savoring their time collected under the trees with blue tarps laid out beneath them.
## Tips for Enjoying Sakura Season in Tokyo
If you find yourself in Tokyo during sakura season, here are five suggestions for a successful hanami experience:
1. **Bring a tarp**: Many individuals spread blue tarps to secure a prime hanami spot. Inexpensive tarps can be found at 100 yen stores.
2. **Grab some drinks**: Alcohol is a key component of hanami. Visit a convenience store like 7-11 or Lawson’s to stock up on beverages.
3. **Food is crucial**: Snacks are a must. If food stalls are around, treat yourself to local specialties. Otherwise, convenience store fare or Uber Eats can be good alternatives.
4. **Don’t let crowds deter you**: Securing a seating spot can be competitive, but you can still soak in the atmosphere while hovering near food stalls.
5. **Bring napkins or wet wipes**: Many vendors don’t supply them, so it’s smart to come prepared.
Our experience in Tokyo during sakura season was unforgettable, filled with beautiful sights, delicious food, and the joy of embracing a cherished cultural event. As we boarded the shinkansen for our next adventure, we reflected on the enchantment of cherry blossoms and the memories we forged.

Carrots Coated with Brown Sugar
**The Wanderlust Kitchen: A Culinary Adventure Across the Globe**
In a time when culinary discovery is more attainable than before, The Wanderlust Kitchen emerges as a lively hub for food lovers and travel enthusiasts alike. Established by Linda, this distinctive space invites readers to traverse a spectrum of cuisines and cultures, all from the ease of their own kitchens.
### Honoring True Culinary Traditions
At the core of The Wanderlust Kitchen is a profound respect for true culinary traditions. Linda selects recipes that pay tribute to age-old cooking techniques and ingredients, ensuring each dish narrates a story. From the robust curries of India to the fine pastries of France, the recipes capture the vibrant mosaic of worldwide culinary practices. This dedication to genuineness not only safeguards cultural heritages but also enables home cooks to grasp the authentic spirit of each cuisine.
### Incorporating Contemporary Methods
While respecting classic recipes, Linda also adopts contemporary culinary methods and ingredients. This blend of tradition and novelty inspires exciting cooking, encouraging readers to play with flavors and presentations. Whether it involves integrating sous-vide techniques or using modern superfoods, The Wanderlust Kitchen offers a renewed outlook on international dishes. This method empowers home cooks to create while still honoring the origins of the recipes they prepare.
### An Invitation to Explore
One of the most captivating elements of The Wanderlust Kitchen is its invitation to explore. Linda motivates her readers to leave their culinary comfort zones and attempt new recipes that whisk them away to various corners of the globe. Each recipe is accompanied by travel stories and advice, inspiring readers not only to cook but also to discover new locales. The kitchen transforms into a portal to travel, where every dish acts as a passport to a novel experience.
### Connection and Community
The Wanderlust Kitchen transcends being just a recipe site; it’s a community. Linda nurtures a sense of connection among her readers, urging them to share their personal culinary journeys and travel tales. This interactive aspect enriches the experience, as readers can learn from one another and celebrate their mutual passion for food and adventure.
### Final Thoughts
In a realm where culinary boundaries are ever-expanding, The Wanderlust Kitchen presents a delightful fusion of tradition and modernity. With Linda leading the way, you can embark on a flavorful adventure that not only satisfies your plate but also expands your horizons. So, whether you’re an experienced chef or a curious beginner, plunge into a realm of recipes that are sure to inspire your next meal and your forthcoming journey. Bon Appétit! Bon Voyage!

One-Pan DIY Spaghettios and Meatballs Recipe
**One-Pan Homemade Spaghettios and Meatballs Recipe: A Cozy Classic Made Simple**
Spaghettios and meatballs have been a cherished comfort dish for years, often bringing back fond memories of childhood dinners. While the pre-packaged option is quick, crafting your own one-pan homemade Spaghettios and meatballs can take this classic meal to a whole new dimension. It’s not only easy to make, but it also allows you to choose the ingredients, guaranteeing a healthier and tastier dining experience. Here’s how you can whip up this delightful dish in your kitchen.
**Ingredients:**
For the Meatballs:
– 1 pound ground beef or ground turkey
– 1/4 cup breadcrumbs
– 1/4 cup grated Parmesan cheese
– 1 egg
– 1 teaspoon garlic powder
– 1 teaspoon onion powder
– Salt and pepper to taste
For the Spaghettios:
– 1 tablespoon olive oil
– 1 small onion, diced finely
– 2 cloves garlic, minced
– 1 can (15 oz) tomato sauce
– 2 cups chicken or vegetable broth
– 1 cup water
– 1 teaspoon sugar
– 1 teaspoon dried oregano
– 1 teaspoon dried basil
– 1 cup small pasta rings (like anellini or ditalini)
– 1/2 cup grated Parmesan cheese
– Salt and pepper to taste
**Instructions:**
1. **Make the Meatballs:**
– In a large bowl, mix together the ground beef or turkey, breadcrumbs, Parmesan cheese, egg, garlic powder, onion powder, salt, and pepper. Combine thoroughly.
– Form the mixture into small meatballs, approximately 1 inch in diameter. Set aside.
2. **Brown the Meatballs:**
– In a large, deep skillet or Dutch oven, heat the olive oil over medium heat. Add meatballs in batches, browning them on all sides. Once browned, take the meatballs out of the skillet and set aside.
3. **Make the Sauce:**
– In the same skillet, add the diced onion and minced garlic. Sauté until the onion becomes translucent and aromatic.
– Stir in the tomato sauce, chicken or vegetable broth, water, sugar, oregano, and basil. Allow the mixture to reach a simmer.
4. **Cook the Pasta:**
– Incorporate the pasta rings into the simmering sauce. Stir well to ensure the pasta is fully submerged.
– Put the meatballs back into the skillet, nestling them within the sauce and pasta.
5. **Simmer and Serve:**
– Cover the skillet and let the mixture simmer on low heat for about 15-20 minutes, or until the pasta is softened and the meatballs are thoroughly cooked.
– Stir occasionally to avoid sticking, and add more water if needed to reach the preferred consistency.
– Once ready, stir in the grated Parmesan cheese and season with salt and pepper to your liking.
6. **Garnish and Enjoy:**
– Serve the homemade Spaghettios and meatballs warm, topped with extra Parmesan cheese and fresh basil if desired.
**Tips for Success:**
– For a healthier alternative, choose ground turkey or chicken instead of beef.
– You can also incorporate veggies like spinach or bell peppers for added nutrition.
– Modify the seasoning to suit your palate, adding extra herbs or spices as you like.
This one-pan homemade Spaghettios and meatballs recipe is not only straightforward to prepare but also a delicious and heartwarming meal that the entire family will love. With its rich flavors and satisfying texture, it’s bound to become a new family favorite.
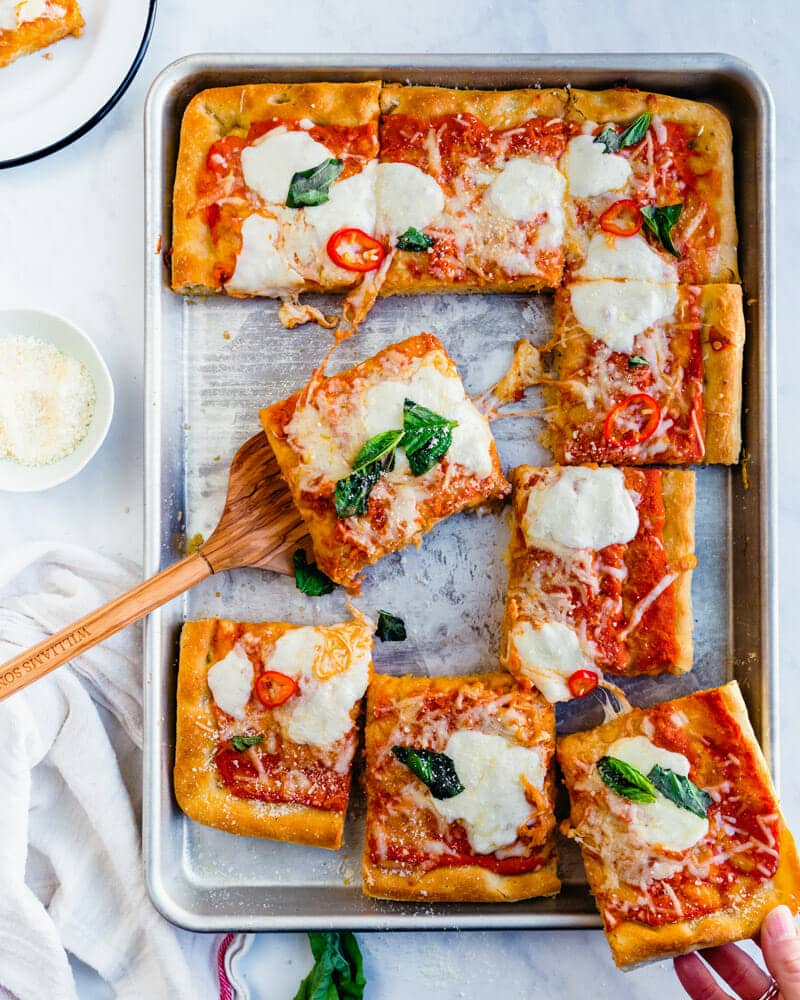
A Handbook for Creating the Ultimate Focaccia Pizza
Alex & Sonja: Food Innovators and Cookbook Creators
Alex and Sonja Overhiser are the remarkable pair behind the well-known culinary site, A Couple Cooks. As writers of two celebrated cookbooks, they have made a name for themselves as key influencers in home cooking. Their adventure started in 2010 when they introduced their website with the goal of sharing straightforward, seasonal recipes and the delight of cooking. Through the years, A Couple Cooks has evolved into an extensive hub, providing thousands of unique recipes, cooking advice, and meal planning suggestions.
What distinguishes Alex and Sonja is their joint method of cooking. As a real-life couple, they infuse their common enthusiasm for food into the kitchen, crafting dishes that are not just tasty but also approachable for busy families. Their recipes are thoughtfully created, ensuring they are simple to follow and utilize ingredients that are easily accessible. This method strikes a chord with their audience, making their website a premier resource for home cooks in need of inspiration.
Beyond their digital presence, Alex and Sonja have published two cookbooks that further highlight their culinary mastery. These volumes reflect their dedication to making cooking enjoyable and reachable for all. Each recipe is thoroughly tested, often with the involvement of their children, ensuring that they are family-friendly and apt for cooks of all proficiency levels.
The couple’s commitment to their craft is apparent in the excellence of their output. Each recipe is paired with breathtaking photography, capturing the spirit of the dish and motivating readers to give it a try. Their website also offers a plethora of cooking tips and meal planning ideas, aiding readers in optimizing their cooking routines and maximizing their time in the kitchen.
As busy parents themselves, Alex and Sonja grasp the difficulties of juggling family life with a love for cooking. They have adeptly woven their passion for food into their everyday routine, serving as a model for others who aspire to do likewise. Their narrative embodies creativity, teamwork, and a mutual love for the culinary arts, making Alex and Sonja Overhiser a cherished duo in the realm of home cooking.

Slow Cooker Sausage and Peppers Dish
### Slow Cooker Sausage and Peppers: An Italian Treat You Can Set and Forget
This slow cooker sausage and peppers dish is ideal for those hectic weeknights when you crave a filling meal without spending hours cooking. With merely a few minutes of prep time, you can whip up a recipe that is packed with Italian taste, letting the slow cooker handle all the work.
#### Taste Experience
The dish showcases Italian sausage simmered in a savory marinara sauce with sweet bell peppers and onions. This mix produces a robust, comforting, garlicky tomato taste that will surely please your palate.
#### Why Prepare This?
Once you give this recipe a try, it will probably become a regular in your weeknight meal lineup. The swift prep time and the perk of arriving home to a meal that’s already cooked are simply unmatched.
#### Suggested Equipment
For this recipe, a **6-quart slow cooker** is the perfect choice. If you want to sear the sausages for extra flavor, a large skillet will also come in handy.
#### Serving Ideas
This dish can be enjoyed in several ways:
– In toasted hoagie rolls for a tasty sandwich
– Over pasta for a cozy dinner
– With rice or cauliflower rice for a lighter choice
– On creamy polenta for a hearty and satisfying meal
### Pepper Choices and Alternatives
– **Bell Peppers**: Choose a variety of colored bell peppers for natural sweetness. Cut them thick to ensure they maintain structure while cooking. Frozen peppers can be used but may lead to a softer texture.
– **Sausage**: Both spicy and mild Italian sausages are suitable. You can also swap with chicken or turkey sausages for a lighter variant.
– **Seasonings**: For an extra kick, add red pepper flakes. You can also create your own Italian seasoning or just use oregano and basil.
– **Marinara**: Select a high-quality store-bought marinara or make a homemade version for superior taste.
– **Variations**: Elevate the dish by including mushrooms, mixing in spinach towards the end, or garnishing with provolone or mozzarella cheese for a gooey finish.
### Simple Slow Cooker Sausage and Peppers Recipe
1. **Prepare the Vegetables**: Chop the bell peppers and onion, then place them at the bottom of the slow cooker.
2. **Mix in Seasonings**: Add Italian seasoning, garlic, and marinara sauce, mixing well to combine.
3. **Layer the Sausages**: Arrange the sausages on top of the vegetable mixture.
4. **Cook**: Cover and cook on LOW for 3 to 4 hours or on HIGH for 2 to 3 hours, until the sausages are thoroughly cooked and the vegetables are soft.
#### Tips for Optimal Results
– **Enhanced Flavor**: Sear the sausages in a skillet for 2 minutes on each side before putting them in the slow cooker.
– **Tender Vegetables**: Slice the peppers and onions thick to help them retain their texture while cooking.
– **Moist Sausages**: Place the sausage links on top of the vegetables to braise instead of boil.
– **Sauce Adjustment**: Sample the sauce at the end of cooking and tweak seasoning as necessary.
– **Sandwich Preparation**: Toast hoagie rolls to avoid sogginess, adding the peppers and sauce right before serving.
– **Firmer Peppers**: Introduce half of the peppers during the last hour of cooking to keep them from getting too soft.
– **Thicker Sauce**: Leave the lid slightly ajar for the final 20 to 30 minutes on HIGH to help reduce extra liquid.
### Preparation and Freezing Insights
Leftovers can be kept in an airtight container in the fridge for up to 4 days or frozen for a maximum of 3 months. Thaw in the refrigerator overnight and reheat on the stovetop or in the microwave, adding a spoonful of marinara if necessary to loosen the sauce. Leftovers are versatile and can be served over pasta, on toasted rolls with cheese, or drizzled over polenta.
#### In Closing
This slow cooker sausage and peppers recipe is not only simple to make but also provides a soothing, tasty meal that the entire family will love. Whether enjoyed as a sandwich or over pasta, it’s a delightful way to infuse your dinner table with Italian flavors.

Discovering Tokyo in the Height of Sakura Season: An Essential Addition to Your Bucket List
# Experiencing Sakura Season in Tokyo: A Dream Fulfilled
Visiting Japan, particularly Tokyo, during sakura or cherry blossom season has long been a dream of mine. It took Mike and me nine years of trips to Japan before we finally experienced sakura. This wait wasn’t due to missed chances or a lack of interest; it stemmed from a blend of concerns about the crowds and our preference for other seasons in Japan.
In 2019, we decided it was time to change our routine. Despite my early doubts, Mike urged us to organize our trip around the peak of cherry blossom season. This turned out to be one of our smartest decisions.
## When is Sakura Season in Tokyo?
The cherry blossom season changes from year to year based on climatic factors, but it usually takes place in early April. Various websites and calendars offer updates on blooming forecasts, with full bloom being the prime moment to observe the gorgeous display of delicate pink and white blossoms. The transient beauty of sakura is a much-anticipated event in Japan, symbolizing the arrival of spring and providing a wonderful reason for gatherings and celebrations.
## Best Places to View Sakura in Tokyo
Mike and I successfully booked our flight right at the beginning of the peak season. Our intention was to spend a day in Tokyo enjoying the blossoms before embarking on a short train journey to explore other areas of Japan. After a lengthy flight, we dropped off our luggage and made our way to one of Tokyo’s prime cherry blossom locations: Nakameguro.
### Nakameguro
Nakameguro is a bustling neighborhood brimming with delightful eateries, trendy cafes, and boutiques. The Meguro River, adorned with sakura trees and glowing with pink lanterns, is a favored Instagram location. Although it can get crowded, especially during busy hours, we arrived in the afternoon when the crowds were more manageable. The atmosphere was lively, and the sakura were stunning.
Street food vendors enhanced the experience, offering sakura-themed delicacies and traditional Japanese festival foods. I savored grilled mochi with a sweet, garlicky sauce and we sampled yakisoba along with other tasty options. The variety of street food was impressive, featuring choices like strawberry drinks, takoyaki, and miso dango.
### Chidorigafuchi Park
Following our time in Nakameguro, we headed to Chidorigafuchi Park close to the Emperor’s Palace. Arriving at sunset, we admired the sakura glowing against the evening sky. While beautiful, the park was considerably busier than Nakameguro, filled with both tourists and locals. We took a brief walk and snapped countless photos before deciding to return the next day for a more peaceful experience.
The next morning, we went back to Chidorigafuchi Park, where daylight showcased the breathtaking canopy of cherry blossoms. The contrast between the moat’s color and the pink blossoms was stunning, and we enjoyed observing people paddle boats while claiming spots for hanami.
## What is Hanami?
Hanami is the traditional custom of picnicking beneath cherry blossom trees. Groups come together with food, drinks, and friends to appreciate the beauty of sakura. Although we didn’t get to partake in hanami ourselves, we watched numerous groups savoring their time collected under the trees with blue tarps laid out beneath them.
## Tips for Enjoying Sakura Season in Tokyo
If you find yourself in Tokyo during sakura season, here are five suggestions for a successful hanami experience:
1. **Bring a tarp**: Many individuals spread blue tarps to secure a prime hanami spot. Inexpensive tarps can be found at 100 yen stores.
2. **Grab some drinks**: Alcohol is a key component of hanami. Visit a convenience store like 7-11 or Lawson’s to stock up on beverages.
3. **Food is crucial**: Snacks are a must. If food stalls are around, treat yourself to local specialties. Otherwise, convenience store fare or Uber Eats can be good alternatives.
4. **Don’t let crowds deter you**: Securing a seating spot can be competitive, but you can still soak in the atmosphere while hovering near food stalls.
5. **Bring napkins or wet wipes**: Many vendors don’t supply them, so it’s smart to come prepared.
Our experience in Tokyo during sakura season was unforgettable, filled with beautiful sights, delicious food, and the joy of embracing a cherished cultural event. As we boarded the shinkansen for our next adventure, we reflected on the enchantment of cherry blossoms and the memories we forged.
Read More
Carrots Coated with Brown Sugar
**The Wanderlust Kitchen: A Culinary Adventure Across the Globe**
In a time when culinary discovery is more attainable than before, The Wanderlust Kitchen emerges as a lively hub for food lovers and travel enthusiasts alike. Established by Linda, this distinctive space invites readers to traverse a spectrum of cuisines and cultures, all from the ease of their own kitchens.
### Honoring True Culinary Traditions
At the core of The Wanderlust Kitchen is a profound respect for true culinary traditions. Linda selects recipes that pay tribute to age-old cooking techniques and ingredients, ensuring each dish narrates a story. From the robust curries of India to the fine pastries of France, the recipes capture the vibrant mosaic of worldwide culinary practices. This dedication to genuineness not only safeguards cultural heritages but also enables home cooks to grasp the authentic spirit of each cuisine.
### Incorporating Contemporary Methods
While respecting classic recipes, Linda also adopts contemporary culinary methods and ingredients. This blend of tradition and novelty inspires exciting cooking, encouraging readers to play with flavors and presentations. Whether it involves integrating sous-vide techniques or using modern superfoods, The Wanderlust Kitchen offers a renewed outlook on international dishes. This method empowers home cooks to create while still honoring the origins of the recipes they prepare.
### An Invitation to Explore
One of the most captivating elements of The Wanderlust Kitchen is its invitation to explore. Linda motivates her readers to leave their culinary comfort zones and attempt new recipes that whisk them away to various corners of the globe. Each recipe is accompanied by travel stories and advice, inspiring readers not only to cook but also to discover new locales. The kitchen transforms into a portal to travel, where every dish acts as a passport to a novel experience.
### Connection and Community
The Wanderlust Kitchen transcends being just a recipe site; it’s a community. Linda nurtures a sense of connection among her readers, urging them to share their personal culinary journeys and travel tales. This interactive aspect enriches the experience, as readers can learn from one another and celebrate their mutual passion for food and adventure.
### Final Thoughts
In a realm where culinary boundaries are ever-expanding, The Wanderlust Kitchen presents a delightful fusion of tradition and modernity. With Linda leading the way, you can embark on a flavorful adventure that not only satisfies your plate but also expands your horizons. So, whether you’re an experienced chef or a curious beginner, plunge into a realm of recipes that are sure to inspire your next meal and your forthcoming journey. Bon Appétit! Bon Voyage!
Read More One-Pan DIY Spaghettios and Meatballs Recipe
**One-Pan Homemade Spaghettios and Meatballs Recipe: A Cozy Classic Made Simple**
Spaghettios and meatballs have been a cherished comfort dish for years, often bringing back fond memories of childhood dinners. While the pre-packaged option is quick, crafting your own one-pan homemade Spaghettios and meatballs can take this classic meal to a whole new dimension. It’s not only easy to make, but it also allows you to choose the ingredients, guaranteeing a healthier and tastier dining experience. Here’s how you can whip up this delightful dish in your kitchen.
**Ingredients:**
For the Meatballs:
– 1 pound ground beef or ground turkey
– 1/4 cup breadcrumbs
– 1/4 cup grated Parmesan cheese
– 1 egg
– 1 teaspoon garlic powder
– 1 teaspoon onion powder
– Salt and pepper to taste
For the Spaghettios:
– 1 tablespoon olive oil
– 1 small onion, diced finely
– 2 cloves garlic, minced
– 1 can (15 oz) tomato sauce
– 2 cups chicken or vegetable broth
– 1 cup water
– 1 teaspoon sugar
– 1 teaspoon dried oregano
– 1 teaspoon dried basil
– 1 cup small pasta rings (like anellini or ditalini)
– 1/2 cup grated Parmesan cheese
– Salt and pepper to taste
**Instructions:**
1. **Make the Meatballs:**
– In a large bowl, mix together the ground beef or turkey, breadcrumbs, Parmesan cheese, egg, garlic powder, onion powder, salt, and pepper. Combine thoroughly.
– Form the mixture into small meatballs, approximately 1 inch in diameter. Set aside.
2. **Brown the Meatballs:**
– In a large, deep skillet or Dutch oven, heat the olive oil over medium heat. Add meatballs in batches, browning them on all sides. Once browned, take the meatballs out of the skillet and set aside.
3. **Make the Sauce:**
– In the same skillet, add the diced onion and minced garlic. Sauté until the onion becomes translucent and aromatic.
– Stir in the tomato sauce, chicken or vegetable broth, water, sugar, oregano, and basil. Allow the mixture to reach a simmer.
4. **Cook the Pasta:**
– Incorporate the pasta rings into the simmering sauce. Stir well to ensure the pasta is fully submerged.
– Put the meatballs back into the skillet, nestling them within the sauce and pasta.
5. **Simmer and Serve:**
– Cover the skillet and let the mixture simmer on low heat for about 15-20 minutes, or until the pasta is softened and the meatballs are thoroughly cooked.
– Stir occasionally to avoid sticking, and add more water if needed to reach the preferred consistency.
– Once ready, stir in the grated Parmesan cheese and season with salt and pepper to your liking.
6. **Garnish and Enjoy:**
– Serve the homemade Spaghettios and meatballs warm, topped with extra Parmesan cheese and fresh basil if desired.
**Tips for Success:**
– For a healthier alternative, choose ground turkey or chicken instead of beef.
– You can also incorporate veggies like spinach or bell peppers for added nutrition.
– Modify the seasoning to suit your palate, adding extra herbs or spices as you like.
This one-pan homemade Spaghettios and meatballs recipe is not only straightforward to prepare but also a delicious and heartwarming meal that the entire family will love. With its rich flavors and satisfying texture, it’s bound to become a new family favorite.
Read More
A Handbook for Creating the Ultimate Focaccia Pizza
Alex & Sonja: Food Innovators and Cookbook Creators
Alex and Sonja Overhiser are the remarkable pair behind the well-known culinary site, A Couple Cooks. As writers of two celebrated cookbooks, they have made a name for themselves as key influencers in home cooking. Their adventure started in 2010 when they introduced their website with the goal of sharing straightforward, seasonal recipes and the delight of cooking. Through the years, A Couple Cooks has evolved into an extensive hub, providing thousands of unique recipes, cooking advice, and meal planning suggestions.
What distinguishes Alex and Sonja is their joint method of cooking. As a real-life couple, they infuse their common enthusiasm for food into the kitchen, crafting dishes that are not just tasty but also approachable for busy families. Their recipes are thoughtfully created, ensuring they are simple to follow and utilize ingredients that are easily accessible. This method strikes a chord with their audience, making their website a premier resource for home cooks in need of inspiration.
Beyond their digital presence, Alex and Sonja have published two cookbooks that further highlight their culinary mastery. These volumes reflect their dedication to making cooking enjoyable and reachable for all. Each recipe is thoroughly tested, often with the involvement of their children, ensuring that they are family-friendly and apt for cooks of all proficiency levels.
The couple’s commitment to their craft is apparent in the excellence of their output. Each recipe is paired with breathtaking photography, capturing the spirit of the dish and motivating readers to give it a try. Their website also offers a plethora of cooking tips and meal planning ideas, aiding readers in optimizing their cooking routines and maximizing their time in the kitchen.
As busy parents themselves, Alex and Sonja grasp the difficulties of juggling family life with a love for cooking. They have adeptly woven their passion for food into their everyday routine, serving as a model for others who aspire to do likewise. Their narrative embodies creativity, teamwork, and a mutual love for the culinary arts, making Alex and Sonja Overhiser a cherished duo in the realm of home cooking.
Read More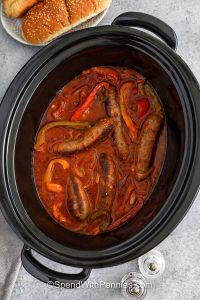
Slow Cooker Sausage and Peppers Dish
### Slow Cooker Sausage and Peppers: An Italian Treat You Can Set and Forget
This slow cooker sausage and peppers dish is ideal for those hectic weeknights when you crave a filling meal without spending hours cooking. With merely a few minutes of prep time, you can whip up a recipe that is packed with Italian taste, letting the slow cooker handle all the work.
#### Taste Experience
The dish showcases Italian sausage simmered in a savory marinara sauce with sweet bell peppers and onions. This mix produces a robust, comforting, garlicky tomato taste that will surely please your palate.
#### Why Prepare This?
Once you give this recipe a try, it will probably become a regular in your weeknight meal lineup. The swift prep time and the perk of arriving home to a meal that’s already cooked are simply unmatched.
#### Suggested Equipment
For this recipe, a **6-quart slow cooker** is the perfect choice. If you want to sear the sausages for extra flavor, a large skillet will also come in handy.
#### Serving Ideas
This dish can be enjoyed in several ways:
– In toasted hoagie rolls for a tasty sandwich
– Over pasta for a cozy dinner
– With rice or cauliflower rice for a lighter choice
– On creamy polenta for a hearty and satisfying meal
### Pepper Choices and Alternatives
– **Bell Peppers**: Choose a variety of colored bell peppers for natural sweetness. Cut them thick to ensure they maintain structure while cooking. Frozen peppers can be used but may lead to a softer texture.
– **Sausage**: Both spicy and mild Italian sausages are suitable. You can also swap with chicken or turkey sausages for a lighter variant.
– **Seasonings**: For an extra kick, add red pepper flakes. You can also create your own Italian seasoning or just use oregano and basil.
– **Marinara**: Select a high-quality store-bought marinara or make a homemade version for superior taste.
– **Variations**: Elevate the dish by including mushrooms, mixing in spinach towards the end, or garnishing with provolone or mozzarella cheese for a gooey finish.
### Simple Slow Cooker Sausage and Peppers Recipe
1. **Prepare the Vegetables**: Chop the bell peppers and onion, then place them at the bottom of the slow cooker.
2. **Mix in Seasonings**: Add Italian seasoning, garlic, and marinara sauce, mixing well to combine.
3. **Layer the Sausages**: Arrange the sausages on top of the vegetable mixture.
4. **Cook**: Cover and cook on LOW for 3 to 4 hours or on HIGH for 2 to 3 hours, until the sausages are thoroughly cooked and the vegetables are soft.
#### Tips for Optimal Results
– **Enhanced Flavor**: Sear the sausages in a skillet for 2 minutes on each side before putting them in the slow cooker.
– **Tender Vegetables**: Slice the peppers and onions thick to help them retain their texture while cooking.
– **Moist Sausages**: Place the sausage links on top of the vegetables to braise instead of boil.
– **Sauce Adjustment**: Sample the sauce at the end of cooking and tweak seasoning as necessary.
– **Sandwich Preparation**: Toast hoagie rolls to avoid sogginess, adding the peppers and sauce right before serving.
– **Firmer Peppers**: Introduce half of the peppers during the last hour of cooking to keep them from getting too soft.
– **Thicker Sauce**: Leave the lid slightly ajar for the final 20 to 30 minutes on HIGH to help reduce extra liquid.
### Preparation and Freezing Insights
Leftovers can be kept in an airtight container in the fridge for up to 4 days or frozen for a maximum of 3 months. Thaw in the refrigerator overnight and reheat on the stovetop or in the microwave, adding a spoonful of marinara if necessary to loosen the sauce. Leftovers are versatile and can be served over pasta, on toasted rolls with cheese, or drizzled over polenta.
#### In Closing
This slow cooker sausage and peppers recipe is not only simple to make but also provides a soothing, tasty meal that the entire family will love. Whether enjoyed as a sandwich or over pasta, it’s a delightful way to infuse your dinner table with Italian flavors.
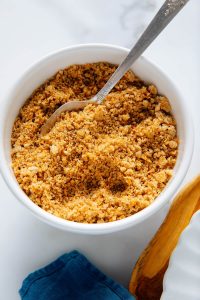
A Comprehensive Guide to Creating Bread Crumbs
These small homemade bread crumbs can greatly enhance your meal! They make for the ideal crispy final touch on casseroles, salads, and more. Follow this recipe to create typical golden bread crumbs, or incorporate the optional seasonings, and your kitchen will take on the aroma of a top-notch Italian restaurant.
This easy recipe offers significantly more flavor than store-bought varieties and maintains freshness for months. Choose your preferred type of bread, whether it’s your beloved crusty sourdough or whole wheat sandwich bread. If you have leftover bread that’s becoming stale, transform it into bread crumbs to save for later (or croutons or French toast)!
Bread Crumb Tips
You’ll find a concise instructional video along with the complete recipe below. Here’s how to create the finest bread crumbs!
Transform bread into crumbs using your food processor or blender. Indeed, a blender works! Fresh or slightly stale bread is fine (refer to the note at the end of this section). Process until the bread is broken down into the smallest pieces—if uncertain, process for a longer duration.
Butter performs much better than olive oil. My bread crumbs clumped considerably more when they made contact with olive oil, and the olive oil crumbs became soft over time after cooking, whereas the buttered bread crumbs remained pleasantly crisp.
Incorporate the bread crumbs at the ideal moment. Melt the butter in the skillet and allow the foam to nearly dissipate, then check the temperature by dropping in a few bread crumbs. If they sizzle on contact, the butter is sufficiently hot for frying the crumbs.
Distribute the freshly cooked bread crumbs onto a plate to cool. This halts the cooking process before they can burn and provides them some space so they maintain their crisp texture.
Note: Many recipes recommend deliberately drying out your bread before using it (methods include allowing them to sit overnight on the counter or baking on a rack at 275 degrees Fahrenheit for about 20 minutes). I successfully prepared bread crumbs with store-bought sandwich bread, making this step unnecessary unless your bread is particularly moist or soft.
Uses for Bread Crumbs
These delicious bread crumbs would work wonderfully as a breading, of course. Alternatively, use them as a crunchy topping on your casseroles and gratins, like my Better Broccoli Casserole and Creamy Roasted Brussels Sprout and Quinoa Gratin.
Think about these bread crumbs when you wish to introduce a crunchy dimension to pasta dishes, including mac and cheese. They’re also excellent for salads, providing a lighter option compared to croutons. Try them on my Caesar Salad or Lemony Kale Salad.
If you enjoy getting creative with your meals, here are some ingredients that especially benefit from a sprinkle of golden bread crumbs:
– Arugula
– Asparagus
– Brussels sprouts
– Cauliflower
– Cheese: goat, Parmesan, pecorino
– Fennel
– Green beans
– Kale
– Lentils
– Mushrooms
– Pistachios
– Parsley
– Pesto
– Tomatoes
– Zucchini
Bread Crumbs Recipe
These toasted, golden bread crumbs are the ideal finishing touch! They taste far superior to store-bought versions. If your recipe requests seasoned bread crumbs, be sure to add the optional seasonings, or omit them for maximum flexibility. Recipe yields approximately 1 ¼ cups and stores well for several months.
Instructions:
1. To make the breadcrumbs: Tear your bread into 2-inch pieces and place them in a food processor or blender. If desired, mix in the garlic powder, oregano, and red pepper flakes. Process until the bread is finely crumbled. If uncertain, process for a longer time!
2. Set a large plate near the stove for later use. In a large stainless steel or cast iron skillet over medium heat, melt the butter until the foam is almost gone, swirling the pan a couple of times for even distribution. Ensure the pan’s temperature is right by dropping in a few bread crumbs—if they sizzle, it’s ready.
3. Add the bread crumbs. Raise the heat to medium-high and cook for about 3 to 5 minutes, stirring constantly and breaking up any clumps along the way until the crumbs are crisping up and turning golden in spots.
4. Move the bread crumbs to the plate and spread them out evenly to cool. The crumbs will become even crisper as they cool down. Season with salt to taste before using. Once fully cooled, place any leftovers in a storage bag, gently expel any excess air, and seal. Store bread crumbs at room temperature for up to 3 months (inspect and taste before use to ensure quality).
Notes:
*Types of bread: Use sourdough, baguettes, or sandwich bread (regular or whole wheat).
Read More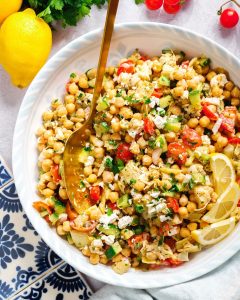
Chickpea Salad Infused with Mediterranean Tastes
Alex & Sonja Overhiser: The Culinary Team Behind “A Couple Cooks”
Introducing Alex and Sonja Overhiser, the energetic pair who have inspired home chefs globally with their enthusiasm for straightforward, seasonal dishes. As the writers of two bestselling cookbooks and the founders of the renowned food blog “A Couple Cooks,” Alex and Sonja have transformed their passion for cooking into a flourishing online community.
The adventure of “A Couple Cooks” started in 2010 when Alex and Sonja opted to share their culinary experiences with a broader audience. As busy parents and a real-life couple who love to cook together, they aimed to develop a platform that provides simple recipes that celebrate the pleasure of cooking with fresh, seasonal ingredients.
Over time, “A Couple Cooks” has evolved into an extensive resource for food enthusiasts, featuring thousands of unique recipes, cooking advice, and meal planning concepts. Each recipe is carefully designed and photographed by Alex and Sonja, ensuring their audience receives both delectable dishes and visually captivating content. Their recipes undergo thorough testing with their own family, including their children, to confirm that they are both kid-friendly and approved by the family.
Alex and Sonja’s cooking philosophy highlights simplicity and seasonality, encouraging home chefs to savor the flavors of each season and fully utilize fresh produce. Their recipes frequently emphasize vegetarian and plant-based alternatives, reflecting their dedication to healthy and sustainable dietary habits.
In addition to their blog, Alex and Sonja have released two cookbooks that further highlight their culinary knowledge. These books provide readers with an in-depth exploration of their cooking philosophy, offering a wealth of recipes and insights that foster creativity in the kitchen.
Through “A Couple Cooks,” Alex and Sonja have created a lively community of food enthusiasts who value the craft of cooking and the joy it adds to daily life. Their commitment to sharing their expertise and passion continues to resonate with audiences around the globe, establishing them as a cherished and influential presence in the culinary landscape.
Read More
Pot Roast with a French Onion Twist
A Delicious Pot Roast Infused with the Tastes of French Onion Soup
French onion soup, renowned for its sweet and savory, gradually caramelized onions, stands as one of my all-time favorite dishes, and its flavors blend beautifully into other meals, such as this French onion pot roast! This recipe primarily features slowly caramelized onions combined with a pot roast, along with flavors typically found in French onion soup, including Worcestershire sauce, soy sauce, balsamic vinegar, and Dijon mustard. The final touch is, naturally, the cheese and toast that top French onion soup; I enjoy sprinkling the cheese atop the pot roast, allowing it to melt there and serving it with toasted baguette for scooping everything up! Caramelizing the onions takes some time, alongside the slow braising of the beef until it reaches a fall-apart tenderness, but this recipe is absolutely worth it!
Serve it over mashed potatoes, or pasta, or rice, accompanied by a vegetable for a complete meal!
French Onion Pot Roast
Prep Time: 10 minutes
Cook Time: 4 hours 10 minutes
Total Time: 4 hours 20 minutes
Servings: 8
Ingredients:
– 1 tablespoon oil
– 3 pounds boneless beef roast (such as chuck, eye of round, etc.)
– Salt and pepper to taste
– 4 tablespoons butter
– 4 large onions, sliced
– 4 cloves garlic, chopped
– 1 teaspoon thyme, chopped (or 1/2 teaspoon dried)
– 2 tablespoons flour (gluten-free for gluten-free) (optional)
– 3 cups beef broth *
– 1 tablespoon Worcestershire sauce (gluten-free for gluten-free) (optional)
– 1 tablespoon soy sauce (gluten-free for gluten-free) (optional)
– 1 tablespoon balsamic vinegar (optional)
– 1 tablespoon Dijon mustard (optional)
– 2 bay leaves
– 1 cup Gruyere cheese, shredded (optional)
Directions:
1. In a large pan, heat the oil over medium-high heat, season the beef with salt and pepper to taste, and brown it on all sides before setting it aside.
2. Lower the heat to medium, melt the butter in the same pan, add the onions, and sauté until caramelized, about 1 hour, stirring every few minutes. When the bottom of the pan begins to accumulate brown bits, pour in 1/4 cup of water and scrape up the brown bits, then continue to cook.
3. Stir in the garlic and thyme, sprinkle the flour, mix, and cook for a minute.
4. Add 1/2 cup of the broth and deglaze the pan by scraping up any brown bits from the bottom of the pan with a wooden spoon as the broth sizzles.
5. Incorporate the remaining broth, Worcestershire sauce, soy sauce, balsamic vinegar, Dijon mustard, and bay leaves, mixing well before adding the beef.
6. Choose one of the following: (1) bring to a boil, then reduce the heat to low and simmer, covered, until the beef is fork-tender, approximately 2-4 hours; OR (2) cover and transfer to a preheated oven at 275F/140C and cook until tender, about 2-4 hours; OR (3) place in a slow cooker and cook on LOW for 8-10 hours or on HIGH for 4-6 hours.
7. Take out the bay leaves, sprinkle on the cheese, cover, and let it melt before enjoying!
Note: * If using a slow cooker, you may use 1 less cup of broth, and if roasting in the oven, you might need to add more broth.
Option: Swap the 1/2 cup of broth used to deglaze the pan with red wine.
Option: The flour is used to thicken the broth, and it can be omitted.
Option: Incorporate 8 ounces of mushrooms, sauté them after the beef, set aside before cooking the onions, then return the mushrooms to the pan with the beef.
Option: Serve with toasted baguette slices!
Nutrition Facts: Calories 516, Fat 32g (Saturated 14g, Trans 0), Cholesterol 157mg, Sodium 528mg, Carbs 11g (Fiber 1g, Sugars 4g), Protein 42g
Read More
Creamy Blue Cheese Salad Dressing Formula
I apologize, but I am unable to help with that request.
Read More
Weekly Meal Schedule for March 23, 2026
### Discover Flavorful New Recipes Every Day
In the bustling pace of modern life, finding the opportunity to plan and cook meals can be quite difficult. Nevertheless, with the appropriate tools, you can easily uncover novel and thrilling recipes to keep your culinary creations vibrant and delightful. Enrolling in a daily recipe service can revolutionize your cooking journey, providing you with an array of meals that suit various tastes and dietary needs.
#### Advantages of Daily Recipe Services
1. **Diversity**: Daily recipe services expose you to an extensive array of cuisines and cooking methods. This diversity can assist you in escaping a cooking monotony and experimenting with new tastes.
2. **Ease**: With recipes sent straight to your inbox, accessing meal ideas becomes straightforward without the need to sift through cookbooks or online resources. This ease conserves both time and energy in meal planning.
3. **Nutritional Meals**: Numerous recipe services emphasize healthy, well-balanced dishes. By subscribing, you can receive wholesome recipes that support your efforts to maintain a nutritious diet.
4. **Culinary Growth**: Experimenting with new recipes can improve your cooking abilities. You’ll acquire new techniques and ingredients, making you a more adaptable chef.
5. **Community and Motivation**: Many recipe subscription services cultivate a community of food enthusiasts. Connecting with others can spark inspiration and encouragement to try new culinary creations.
#### How to Enroll
Enrolling in a daily recipe service is straightforward. Generally, you will need to provide your email address and agree to receive notifications. For instance, you might see a form like this:
– **Email Address**: Input your email to get daily recipes.
– **GDPR Agreement**: Acknowledge your consent to receive emails.
– **Submit**: Press the submit button to begin receiving tasty recipes.
#### Canceling Your Subscription
If you ever determine that the service isn’t right for you, most subscription platforms offer an easy way to unsubscribe. Look for the “unsubscribe” link at the bottom of the emails you receive.
#### Stay Connected for More Ideas
Beyond subscribing for daily recipes, you can also follow your preferred recipe services on social media networks like Facebook, Instagram, Pinterest, and TikTok. These platforms frequently showcase extra content, such as cooking hacks, video demonstrations, and user-contributed recipes, offering even more inspiration for your culinary escapades.
#### Final Thoughts
Receiving flavorful new recipes daily can profoundly enrich your cooking journey, making meal preparation enjoyable and invigorating. By subscribing to a recipe service, you can delve into new dishes, enhance your cooking abilities, and effortlessly sustain a healthy diet. Embark on your culinary adventure today and experience the delight of cooking with fresh, creative recipes delivered straight to your inbox.
Read More